Description
Description
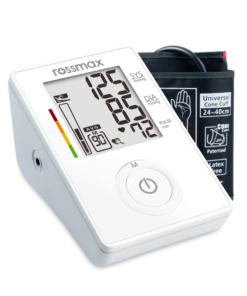
The Rossmax Wrist Blood Pressure Monitor is a jumbo size XL digit that measures blood pressure. The monitor uses an average of the last three readings and has 120 memories for 2-users with date & time indication, while also having features such as movement detection, hypertension risk indication and irregular Heartbeat Detection (IHB). It also has a guest mode and lifetime calibration, along with a 5 year warranty.
The Rossmax Wrist Blood Pressure Monitor uses Smart Sense Technology to utilize an advanced air control system. The electronic deflation valve precisely controls the deflation rate and allows the monitor to detect and analyse pulse signals, adjusting cuff pressure during deflation. This significantly ensures more precise analysis, while reaching greater accuracy.
The Rossmax Wrist Blood Pressure Monitor comes with the following:
- Batteries
- Instruction Manual
- Carrying case
- PC Link (Optional)
- BP Manager
- Mobile Calibration System
Uses
The Rossmax Wrist Blood Pressure Monitor uses the oscillometric method to detect your blood pressure. During the deflation of the wrist cuff, the monitor is detecting the pressure oscillations generated by the beat-to-beat pulsatile. Any muscle movement during this period of time will cause measurement error. After detecting the amplitude and the slope of the pressure oscillations, the monitor will determine the systolic and diastolic pressures, and your pulse rate is detected at the same time.
Application
Installing Batteries:
• Open the battery cover in the right direction
• Install 2 AAA size batteries in the right position
• Replace the cover and click in the other end to secure the battery cover
• Replace the batteries if: the weak battery mark appears in the display or nothing appears in the display when the ON/OFF/START key is pressed
• Replace the batteries in pairs
• Remove batteries when unit is not in use for extended periods of time
• Always replace with new batteries together
• Use batteries of the same brand and same type
Applying the Cuff:
• Remove all watches, jewellery, etc. prior to attaching the wrist monitor
• Clothing sleeves should be rolled up and the cuff should be wrapped on bare skin for correct measurements
• Apply cuff to left wrist with palm facing upwards
• Make sure the edge of the cuff is about 1 cm from the palm as
• In order to ensure accurate measurements, fasten the velcro strap securely around your wrist so there is no extra space between the cuff and the wrist
• If the cuff is not wrapped tight enough, the measurement values may be false
• If your GP has diagnosed you with poor circulation on your left arm, carefully place the cuff around your right wrist and do the measurement this way
Correct Posture for Taking a Measurement:
• Place your elbow on a table so that the cuff is at the same level as your heart – your heart is located slightly below your armpit a bit to the left of the middle of your chest
• Relax your entire body, especially the area between your elbow and fingers
• If the cuff is not at the same level as your heart or if you cannot keep your arm completely still throughout the reading, use a soft object such as a folded towel to support your arm
• Do not allow hard objects to come in contact with the wrist cuff
• Turn your palm upwards
• Sit upright in a chair, and take 5-6 deep breaths
• Avoid leaning back while the measurement is being taken
Measurement Procedures:
• Blood pressure changes with every heartbeat and is in constant fluctuation throughout the day
• Blood pressure recording can be affected by the position of the user, his or her physiologic condition and other factors
• For greatest accuracy, wait one hour after exercising, bathing, eating drinking beverages with alcohol or caffeine, or smoking to measure blood pressure
• Before measurement, it’s suggested that you sit quietly for at least 5 minutes as measurement taken during a relaxed state will have greater accuracy – you should not be physically tired or exhausted while taking a measurement
• Do not take measurements if you are under stress or tension
• During measurement, do not talk or move your arm or hand muscles
• Do not cross the legs while sitting and keep the feet flat on the floor during measurement
• Take your blood pressure at normal body temperature – if you are feeling cold or hot, wait a while before taking a measurement
• If the monitor is stored at very low temperature (near freezing), have it placed at a warm location for at least one hour before using it
• Wait 5 minutes before taking the next measurement
Taking A Measurement:
• Press the User-Switching key to select memory zone 1 or memory zone 2 or guest mode
• Place the cuff on the wrist. Press the ON/OFF/START key
• All digits will light up, checking the display functions
• The checking procedure will be completed in 2 seconds
• After all symbols appear, the display will show a blinking “0” – the monitor is ready to measure and will automatically inflate the cuff to start measurement
• When the measurement is completed, the cuff will exhaust the pressure inside
• Systolic pressure, diastolic pressure and pulse will be shown simultaneously on the LCD screen with the date and time appearing on alternating manner in every 4 second interval
• The measurement is then automatically stored
• Press the ON/OFF/START key to turn off the power – if no key is pressed, the unit will shut off automatically in 1 minute.
Recalling Values from memory:
• This monitor has two memory zones that can store up to 60 measurements
• To read memory values from a selected memory zone, use the user-switching key to select a memory zone (1 or 2) from which you want to recall values
• Press the memory key and the first reading displayed is the average of the last 3 measurements stored in memory
• Continue to press the memory key to view the last previously stored measurement
• Every measurement comes with an assigned memory sequence number
• The memory bank can store up to 60 readings – when the number of readings exceeds 60, the oldest data will be replaced with the new record